|
Website: http://www.truevalue.com
Level of difficulty: Beginner
Concrete, stone, concrete block, and other masonry foundation materials have very little insulating value - a foundation wall can account for approximately
20% of heat loss. Adding insulation will keep your basement warmer, make the floors above warmer and more comfortable, plus it will lower heating bills.
Insulating is often the first step toward creating additional living space for a growing family, home office, or similar use. The Model Energy Code recommends
R-11 insulating values for basement walls in most of the country and R-15 for the northernmost states.
For an unfinished basement where you don't want or need finished walls and want to leave insulation exposed, a good choice might be a blanket insulation
that is covered with a white flame-resistant polypropylene facing, such as CertainTeed's Basement Insulation.
For finished basements it's best to install traditional faced or unfaced batt insulation between studs in a framed wall. Although you can attach foam
insulation panels to the walls between wood furring strips, Fiberglas is much cheaper. Building and fire codes require that foam or Fiberglas batt insulation
be covered with drywall or other finish wall.
 Caution:
Airborne Fiberglass is irritating to your skin, eyes and lungs, and some say it may present much more serious health consequences when breathed
into the lungs. Whatever the truth reveals itself to be in time, be sure to wear safety glasses, a dust mask or respirator, and clothing that covers
your skin. Wash work clothes separately and run an extra rinse cycle. |
Tools & Materials
Basic requirements:
- Safety glasses and dust mask or respirator
- Stapler (electric, standard, or hammer type)
- 3/8" or 1/2" staples
- Protective clothing
- Insulation
- Work light
- Tape measure
- Extension cord
- Utility knife and extra blades
- Stepladder(s)
- Straightedge for cutting insulation
|
Other items depending on approach:
- Expanding foam sealant
- Powder-actuated gun w/fasteners
- Polyethylene sheeting
- Hearing protection
- Asphalt roofing cement
- Masonry screws w/carbide drill bit
- Wire insulation hangers
- Construction adhesive cartridges
- Extruded polystyrene foam
- White vinyl tape
- Caulking gun and caulk
- Construction tape or duct tape
- 2x2 lumber
- 1/2-in. gypsum drywall
- Chalk line
|
Before you insulate:
- Solve any basement water problems.
- Take the time to seal the joint between the foundation and the mudsill (the framing member that rests on the foundation) with an expanding
foam sealant to stop air infiltration.
- To limit dampness coming through the wall from outside you can also cover the wall (from the ground level down only) with plastic sheeting
adhered with asphalt roofing cement, which is available in a caulking gun cartridge.
|
 Installing Exposed Blanket Insulation
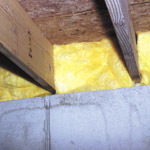
1. Insulate the Band Joist
In walls perpendicular to the first-floor joists, cut short lengths of unfaced batt insulation and press them between the joists against the band
joist to which they attach. On walls parallel to joists, press faced insulation with the Kraft side facing toward the floor above, holding it in
place with wire insulation hangers pressed between the joists.
Photo courtesy of CertainTeed Corporation |
 Tip:
Tip:
In very cold climates this approach may result in condensation on the band joist. An alternative would then be to use carefully cut blocks of extruded
polystyrene foam against the band joist, sealed with caulk around the perimeter to prevent moist interior air from getting behind the insulation.
This insulation should then be covered with pieces of drywall for fire protection. |
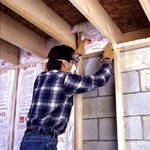
2. Install Furring Strips
Install 2x2 furring strips on the mudsill at the top of the wall. Strike a chalk line on the wall either 48 or 72 inches (according to the insulation
roll width) below the top of the furring strip and install a second furring strip below the line. Install a third furring strip spaced 1/2 inch
above the floor. Install furring strips around window openings and obstructions such as electrical panels, and (optional) vertically at inside wall
corners. |
Tip:
Powder-actuated guns are the fastest way to anchor furring strips to concrete but are considered dangerous by some for DIY use. If you are comfortable
with the tool, wear eye and hearing protection. Or use masonry screws installed into pilot holes drilled with special masonry bits that are packaged
with the screws. In either case it's a good idea to apply construction adhesive to the strips before applying them. |
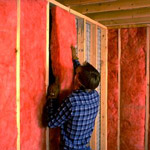
 3. Insulate Walls
Unroll insulation with the facing toward you and staple it every 4 inches to the top and middle furring strips. You'll need a helper and a couple
of small ladders for this operation. Similarly install the bottom course, which may require cutting to fit between the middle and bottom furring
strips. When cutting, don't forget to leave an extra 1-1/2 inches of facing that you can staple to the lower furring strip.
Photo courtesy of CertainTeed Corporation |
4. Tape Seams
Tape all seams and joints (and any tears) with a white vinyl tape. |
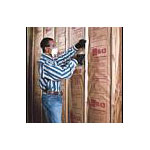
Insulating a Stud Wall
1. Insulate Walls
Measure the height of the wall and cut insulation batts to fit snugly between the top and bottom plates (horizontal members to which studs are attached).
If you are using high-density (R-15) unfaced batts or special unfaced insulation for masonry walls, press it into place (left) and friction will
hold it. If you are using a faced batt (right), press it into place and staple the flanges either on the edges or sides of the studs, or to the
faces of furring strips, every 8 to 12 inches. Work from the top down, pulling the flange down as you staple to remove any puckering (fishmouths).
Photos courtesy of Owens Corning
|
Tip:
To cut Fiberglas insulation: Place the insulation - Kraft side (if any) facing down - on a scrap of plywood. Lay a board across the roll and press
down on it to compress the insulation while you cut through the insulation with a sharp utility knife in one or two passes. |
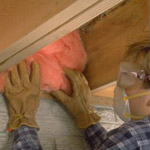
2. Insulate the Band Joist
Follow the same procedures as described in Step 1 of the previous section. Faced insulation may be used only if it will be covered with drywall.
 |
 |
| Photos courtesy of Owens Corning |
|
|
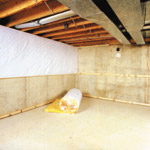
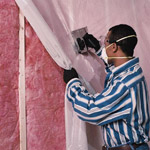 3. Apply Vapor Retarder
If you used unfaced insulation apply 4-mil polyethylene sheeting over the entire wall by stapling it to the top plate and studs. Seal any accidental
tears with red construction tape (as sold for Tyvek and other air-infiltration barrier films) or duct tape.
Photo courtesy of Owens Corning |
Caution:
Do not leave the insulated wall exposed. Codes require that you cover insulated walls, typically with 1/2-in gypsum drywall or other wall finish
such as wood paneling.
|
Note: This article was submitted by a second party and the contents are subject to our disclaimer.
|