|
Website: http://www.truevalue.com
Level of difficulty: Beginner

A crack in concrete or masonry, left unrepaired, may cause more serious problems and result in a more expensive repair. A crack in a concrete sidewalk or
driveway, for example, admits water which can erode and settle the soil under the walk causing the concrete to break or sink. In cold climates, cracks in
masonry chimneys, foundations, and virtually any concrete/masonry structure exposed to the weather admit water, which expands as it freezes and widens the
crack. A repair will look better, prevent further damage, and, in the case of walks and stairs, may improve safety.
There are three repair options readily available to do-it-yourselfers. In many cases they cannot be considered permanent repairs and may therefore need
to be repeated. Large reappearing cracks in a foundation, chimney, or other structural application may indicate a more serious problem that should be evaluated
by a structural engineer or concrete/masonry contractor. Here are the DIY repair options we suggest:
- Vinyl concrete patching compound, for cracks 1/4 inch or wider;
- Pourable grout that is specifically designed for cracks in concrete. It will fill cracks up to 1/2 inch wide but it is especially useful
for very narrow cracks (horizontal surfaces only);
- Acrylic latex caulk specifically designed for filling concrete and masonry cracks (cracks from 3/8 to 1/2 inch wide).
|
 Caution: Caution:
Read product label cautions. Concrete patchers, for example, may cause burns. Protect your skin with the proper clothing and gloves and wear a dust
mask and goggles. |
Materials Needed:
- Protective clothing as needed
- Mason's hammer or small hand sledge hammer
- Dust mask, goggles, and gloves
- Broom or brush
- Mason's chisel or wire brush
- Vinyl concrete patcher and pointing trowel or
- Air compressor or canned air
- Pourable grout or
- Garden hose and nozzle
- Acrylic latex textured caulk for concrete, caulking gun, sand or foam backer rod, and trowel
|
1. Clean the Crack
Whatever your repair approach, you must start with a clean surface for proper bonding. Remove loose materials with a stone chisel or wire brush.
Then use an air compressor (if you have one) to blow dust out of the crack - don't forget to wear goggles and a dust mask - or blast out the dirt
with water using a garden hose and nozzle. |
 Tip: Tip:
If your crack is small and you don't have an air compressor and don't want to use water to clean out the crack, you can use canned air (commonly
used to clean photo and electronic equipment). |
2. Undercut Very Wide Cracks
Concrete expands and contracts in response to temperature changes and often the material used to fill a crack will pop out under pressure. The repair
will stand a better chance of staying put if you use a 5-lb. sledge or mason's hammer and mason's chisel to chip away at the crack until it is wider
below the surface than it is at the surface. Practically speaking this is only reasonable to do for crack wider than about 1/2 inch. |
|
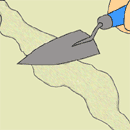 3. Fill
the Crack 3. Fill
the Crack
Using vinyl concrete patcher: Prepare only the amount of material that will be used within about 20 minutes. Mix the powder with water as directed,
and wet the walls of the crack with a hose or spray bottle. Use a pointing trowel to press the material into the crack in layers no thicker than
1/4 inch. (The material shrinks as it dries, and if you apply too much at a time it will crack!) Allow each layer to dry for at least a few hours
before applying the next. When the patch is flush with the surface, hold the trowel flat and use a swirling motion as shown to blend the material
into the surrounding surface. |
Tip:
If the surface being repaired is rough, such as a sidewalk, brush the patch material with a block of wood or (for an even rougher texture) a stiff
broom. |
Using textured caulk: Caulk must be applied to a dry surface only. If the crack is deeper than 3/8 inch, fill it to within 3/8 inch of the surface
with clean, dry sand (for a horizontal surface) or foam backer rod (for horizontal or vertical surfaces). Cut off the tip of the cartridge on an
angle to make a 1/4-in. to 3/8-in. hole. Fill or slightly overfill the crack and then smooth it with a wetted trowel or block of wood. |
Using pourable grout: Wet the surface as with concrete patcher (above) and fill deep cracks with sand to within 1/4 inch of the surface, or pour
in the grout in layers no more than 1/4 inch thick. Cut the tip of the container off to create a hole a little smaller than the width of the crack.
Allow complete drying between applications. Slightly overfill the crack to allow for shrinkage. |
Note: This article was submitted by a second party and the contents are subject to our disclaimer.
|