|
Website: http://www.truevalue.com
Level of difficulty: Intermediate

Casing, as the trim around doors (and windows) is called, has a strong impact on the overall style, appearance, and proportion of an opening as well as
the overall style of your home's interior. On the practical side, it conceals the gap between the door frame (called a jamb) and the rough opening and helps
to hold the frame in the opening.
Casing can be relatively plain, such as the popular clamshell design or square-edge design (called S4S), or detailed, such as colonial-style molding.
By far the most popular casing joint design (and the one described in this column) is the mitered picture-frame casing.
If you want to install a new door including the frame and you elect to use a "pre-hung" door, it may have the casing already mounted on one side. If
so, you only need to install the casing on the opposite side after the jamb is plumbed, squared, and secured in the opening. If you are retrimming an existing
doorway, your first step will be to pry off the existing casing.
Tools & Materials:
- Safety glasses or goggles
- 4d finishing nails
- Trim pry bar
- Block plane
- Hammer
- Surform tool
- Utility knife
- Sanding block
- Drywall-taping knife or wide putty knife
- Coarse-, medium-, and fine-grit sandpaper
- Combination square
- Wood glue
- Sharp pencils
- 6d or 8d casing nails (or finishing nails)
- Tape measure
- Nail set
- Casing
- Putty knife
- Power miter saw (rent or buy)
- Wood putty or acrylic caulk (if painting)
- Finishing supplies (paint, stain, etc.)
- Wax putty sticks (if staining)
1. Remove Existing Casing
If you are retrimming an existing door, pry off the existing casing carefully so you won't damage the wall or the doorjamb. |
 Caution:
Always wear eye protection during demolition, cutting, and nailing procedures. To prevent possible puncture injury, immediately bend over or pull
any nails from the removed casing. |
 Tip:
Tip:
If a film of paint or bead of caulk bridges the joint between the casing and the wall, cut the seal with the point of a utility knife before attempting
to pry the trim. This makes prying easier and eliminates the chance that you will pull off some of the wall finish or surface paper when you pry
the casing. Also, insert a thin flat blade (such as that on a drywall-taping knife or wide putty knife) between the trim and the pry bar so you
can pry without damage to the wall. |
2. Mark the Reveals
The inside edge of the casing is typically placed back from the inside edge of the jamb by about 3/16 inch. To mark this reveal, set the blade position
in a combination square so it protrudes 3/16 inch and mark jambs at the top corners, the midpoint of the head jamb, and several points along the
side jamb. To make the mark, position the body of the square against the face of the jamb with the blade extending over the edge and mark at the
end of the blade. |
3. Cut All Miters
Measure the distance between your marks on the side jambs at the upper corners (frame opening plus 2 times the reveal) and miter-cut your head casing
at 45 degrees on both ends so the short dimension equals your measurement. Cut miters on one end of each piece of side casing. Remember that one
will be left-handed and one right handed. (You'll square-cut it to length in Step 6.) |
 Tip:
Tip:
While not absolutely necessary, a power miter saw is far better than a miter box saw, even a professional-quality one. The power saw makes perfect
cuts and can also make the very fine tapered adjustments that are often necessary for perfect miter joints. If you can't justify buying one, rent
one. |
 Caution:
If you are a novice, obtain and read a tool operator's manual, book, or article dealing with use of the power miter saw; or ask the rental dealer
to explain how to safely use it. |
4. Prime or Stain
Before you install the casing: if you intend to paint, apply a primer, or if you plan a natural finish, apply a stain and first topcoat. Cover the
sides and both faces to seal the wood and prevent warping. Prefinishing is also easier than painting in place, especially if you don't intend to
paint the walls when the installation is complete. If you stain before assembly, you also avoid the problem of stain not taking over any glue spots
at the joints. |
 5. Tack Head Casing
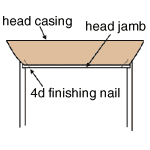
Using 4d finishing nails, lightly tack the head casing into the jamb so it just covers your pencil marks. If the casing is being installed on the
exterior you must use weather-resistant fasteners, such as hot-dipped galvanized nails. |
 Tip:
Tip:
To prevent splitting in this usually thin edge of the casing keep your nails back at least one inch from the ends of the molding. It also helps
to lubricate the nail by carefully rubbing it against the side of your nose (yes, nose oil really works!). |
 6. Cut and Test-fit Side Casings
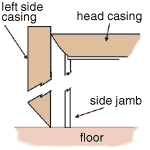
Stand the left side casing upside down next to the left jamb with its long side against the point of the head casing, and mark its desired length
directly. Alternatively, measure from the floor to the top left-hand edge of the head casing and transfer that measurement to the casing. Square-cut
at your mark and test the fit. |
 |
7. Make Adjustments
If the miter does not meet without a gap, which can happen if the jamb is not square or if it sits slightly below or above the plane of the wall,
the casing miter may need recutting. Since cutting will result in the casing being slightly short, however, first try one of the following procedures:
a. If a joint is open because the jamb protrudes out from the wall plane, use a sharp block plane to plane at least the last foot or so of the
head and side jambs until they are flush with the wall.
b. If the jamb sits slightly below the surface, you may be able to improve your miter fit by removing a little of the drywall where it bumps
into the back of the casing.
c. Use a Surform tool or a wooden sanding block with coarse sandpaper to back-bevel the miter cuts slightly. By removing some material from the
back edge of the mitered face of one or both mating pieces, you may be able to close the open joint on the face of the joint (the only part that
shows).
|
 |
8. Secure Casing
Apply glue to the end of the side casing and position it so it fits tightly with the head casing. (Don't worry about lining it up with the reveal
marks on the rest of the jamb yet.) Secure it to the jamb with 6d or 8d casing (or finishing) nails. Position the nail about 1 inch from the end
and near the outside edge of the casing. Then use a 4d finishing nail to secure the inside edge of the casing to the jamb. See the tip under Step
5 to avoid splitting the molding when you nail it. Once the miter is tight, continue nailing the rest of the casing. Work your way from the top
down, nailing at five equally spaced positions. Repeat for the opposite side and then complete nailing the head casing at the two ends and midpoint.
|
 |
 9. Cross-nail Miters
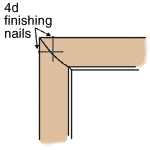
To prevent miters from opening, drive a 4d finishing nail through the edge of the head and side casings about 3/4 inch from the outside corner.
This will lock them together. Once again, see tip under Step 5 to avoid splitting the molding. |
10. Finishing Touches
Wipe off any excess glue immediately with a damp cloth, drive all nail heads slightly below the surface with a nail set and hammer, and hand-sand
as needed to make casings flush with each other and to eliminate any splinters. If you plan to paint, fill nail holes with wood putty or acrylic
caulk first; if you will stain, fill them with colored wax putty sticks after you complete finishing. |
Note: This article was submitted by a second party and the contents are subject to our disclaimer.
|

