|
Website: http://www.truevalue.com
Track lighting is both beautiful and functional. It can add drama to any room by allowing you to direct the light where you want it. A variety of heads
and lamps let you control the shape and intensity of the light beam. It also adapts easily to modifications in room layout, and add-ons are possible. Here
are the basics for installing track lighting in your home.
Materials List
- Ladder or stepstool
- Screwdriver
- Toggle bolts
- Neon voltage tester
- Drill and 5/8-in. spade bit
- Long-nose or electrician's pliers
Track Lighting:
- Track
- Live end
- Dimmer (optional)
- Heads
- Ceiling outlet adapter
|
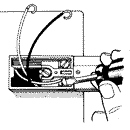
 1. Power Off
Turn off electrical power to the ceiling light. Use a neon tester to double-check that power is off, especially if there is more than one set of
wires in the ceiling outlet. Next, remove the existing light fixture and disconnect wires carefully so the exposed ends do not touch each other. |
 Caution:
Never work on live wires. Locate the circuit breaker or fuse for the existing ceiling light and cut the power. |
 Tip:
Tip:
The ceiling outlet can be located anywhere along the track but you must buy the appropriate "live end" connector and ceiling outlet adapter. |
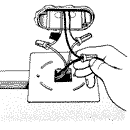
 2. Wire Live End
Insert live end into the track and tighten the setscrew to secure it. Then attach the mounting bracket to the live end. Secure a short black wire
(pigtail) to the brass screw, the white pigtail to the silver screw, and the green (or bare) pigtail to the green grounding screw. |
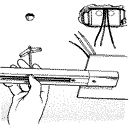
Step 3. Locate/Drill Mounting Holes
Position the track to mark mounting holes on the ceiling and drill 5/8-in.-diameter holes for toggle bolts as directed. If you happen to hit framing
while drilling, use a screw instead of a toggle bolt at that location. |
 4. Mount Track to Ceiling
With toggle bolts installed through track mounting, lift track to ceiling. Insert toggle wings into the mounting holes you drilled but don't tighten
them yet. |
 5. Connect to House Wiring
Twist wire connectors onto the matching colored house and pigtail wires to lock them together. Secure the mounting plate to the ceiling box with
the screws provided, and tighten toggle bolts. |
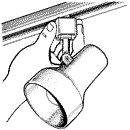 6. Install Heads
Snap or twist track heads into the track. There's a groove in the head that must correspond with a ridge in one side of the track to ensure proper
polarity. Next, restore power. Adjust the position and angle of heads to direct light where you want it. |
Tip:
For even greater light control and versatility, you can replace your standard light switch with a dimmer according to directions that accompany the dimmer.
Note: This article was submitted by a second party and the contents are subject to our disclaimer.
|