|
Website: http://www.truevalue.com/
Level of difficulty: Advanced

An attic should be ventilated year-round. In summer, ventilation prevents excessive heat buildup, which may shorten the life of some roofing materials and
drive up cooling costs. In winter, ventilation pulls out interior moisture, which tends to collect in attics and may saturate insulation or cause mold and
mildew to grow. In general, you should provide vents equal to 1/300 of the ceiling area of the top floor. For truly effective cross-ventilation, vents should
be located low (as soffit grilles or continuous soffit vents at the roof eaves) and high (near the roof peak, in the form of either gable-wall vents or
fans, ridge vents, or roof ventilators).
This project describes the basic steps to install a powered ventilator in a gable-end wall. Choose a model that is controlled with a thermostat and,
if moisture buildup has been a problem, with a humidistat.
Materials List
- Tape measure
- Work light and extension cord
- Pocket calculator
- Goggles and dust mask
- Extension ladder
- Wall-mounted attic ventilator
- Siding removal/reinstallation tools as required
- 2-ft. level
- Carpenter's square or combination square
- Drill and 1/2-in. spade bit
- Portable jigsaw or reciprocating saw
- Circular saw or crosscut handsaw
- 2x4 and/or 3/4-in. plywood
- 8d common nails
- Hammer
- Neon circuit tester
- Standard and Phillips screwdrivers
- Wire stripper/cutter
|
1. Determine Fan Capacity
The Home Ventilating Institute recommends that one or more power attic ventilators provide at least 10 air exchanges an hour. Multiply the length
by the width of your attic floor to determine its area, and multiply the result by 0.7 to determine how many cubic feet per minute (CFM) of air
the fan(s) must move.
(L x W) x 0.7 = CFM
Add 15 to 20 percent to the result for steep roof pitches (such as 8/12 pitch, which means 8 inches of vertical rise in 12 inches of horizontal
run) or if you have dark roof shingles.
|
2. Determine Intake Vent Requirements
Divide the CFM capacity of the fan by 300 and multiply by 144 to determine the minimum area (in square inches) of intake vents.
(CFM / 300) x 144 = min. area (sq. in.)
For information on soffit vents contact The Home Ventilating Institute (a division of the Air Movement and Control Association International
Inc.) at 847-394-0150.
|
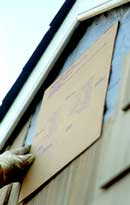 3. Cut Wall Opening 3. Cut Wall Opening
Working from the top down, remove the siding below the roof peak and center and level the template for the louvered vent, as shown. Following the
manufacturer's instructions, bore a starter hole through the wall sheathing and cut the opening with a portable jigsaw or reciprocating saw. (If
you have an adequately sized louvered vent, skip to Step 6.) |
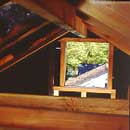 4. Frame the Opening 4. Frame the Opening
Provide framing and/or a plywood mounting board, as directed by the manufacturer. Additional cutting of existing framing from the inside may be
required. |
 Caution: Caution:
Provide adequate work lighting.
Lay down a temporary floor, such as a piece of plywood, if needed. Wear goggles and dust mask.
|
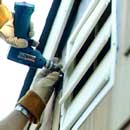 5. Install the Louver or Shutter 5. Install the Louver or Shutter
Secure the exterior accessory shutter (shown) with screws and reinstall the siding. Siding manufacturers are usually good sources for how-to information
on siding installation and repair, which vary according to the type of siding. |
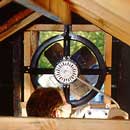
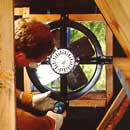 6. Mount the Fan 6. Mount the Fan
Mount the fan to the framing or mounting board with screws, as directed by the manufacturer. |
 7. Install the Controller 7. Install the Controller
Remove any knobs and the cover so you can secure the controller to the mounting plate or studs with screws, and follow the manufacturer's instructions
for locating the unit. Do not substitute controls (such as solid-state speed controls) that are not approved by the manufacturer. |
8. Make Wiring Connections
All electrical work must be done in accordance with local codes. If you are not familiar with basic wiring procedures, hire a licensed electrician.
Follow the manufacturer's wiring diagram to make the connection to your power supply. Shut off the breaker or remove the fuse for the fan circuit;
and verify that it is off using a neon circuit tester. |
9. Adjust Settings
Thermostats and humidistats are adjustable. Follow the manufacturer's guidelines and instructions to make the necessary adjustments. |
Note: This article was submitted by a second party and the contents are subject to our disclaimer.
|