
| Home | Add URL | Privacy | Visitors | Contact Us | Disclaimer |
|
|||||||||
|
Installing a Doorbell or Door Chime |
| "This project has you covered whether you need to install a door chime from scratch (including button, chime, and transformer), add a button to a second door, or just replace or upgrade a component." | |
|
|
Install A Door Chime |
|
|
Find Electric & Cabling Contractors, Electrical Supplies, Professionals, and Services in Canada, United States, and United Kingdom! Electrical Contractors, Builders, Remodelers, Professionals, Electrical Suppliers, and Businesses - join us in building the Best Home Improvement Directory on the Web by adding your Listing or Informational Article Today! Go To Electric & Cabling Contractors |
Website: http://www.truevalue.com Level of difficulty: BeginnerThis project has you covered whether you need to install a door chime from scratch (including button, chime, and transformer), add a button to a second door, or just replace or upgrade a component. Feeding the wires behind closed walls between the components, a process called fishing, is the only potentially difficult task in this installation. If your basement or crawl-space ceiling is open (unfinished), the task usually is quite doable, even for a beginner. However, if your circumstances make fishing wires too difficult, consider installing a wireless system. And if you are not comfortable making the basic 120-volt wiring connection to the transformer, then complete all the low-voltage wiring and call in an electrician to connect the transformer. Following are the basics for installing a door chime. Plan to locate the transformer and chime where access will be most convenient and don't worry about the length of the wire runs, since low-voltage wire is inexpensive. Materials List:
 1. Install the Chime's Mounting Base
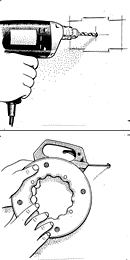
Mark the chime mounting base location and bore a wiring hole through the wall (top). Then screw the base to the wall with screws and wall anchors, which are typically provided (bottom). In this and subsequent steps, use caution when boring holes. Drill slowly and stop immediately if you encounter any unusual resistance or hear a metallic sound! When drilling from the first floor to the basement or crawl space, have a helper check your progress and warn you of any impending problem. 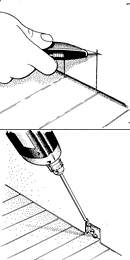 2. Feed Wires to Chime
Pry off the baseboard trim and use a utility knife to cut out a section of drywall that will be behind the trim and directly below the chime (top). Using an extra-long 3/8-in. spade bit (or a standard spade bit and a bit extension), drill an access hole at an angle through the bottom wall plate and into the basement/crawl space (bottom). Feed the necessary low-voltage wires to the chime: feed a length of chain into the wall cavity at the mounting base; pull the bottom end out the hole at the floor and twist-attach the low-voltage wires; then pull the chain to draw the wires up and out of the upper hole. Reinstall the baseboard with 6d finishing nails. In this and subsequent steps be sure to label or color-code all wiring (i.e., button-to-transformer or chime-to-button). 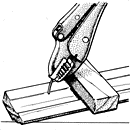 To avoid damaging the face of the trim, pry nails out the back with locking pliers or nippers (end-cutting pliers). 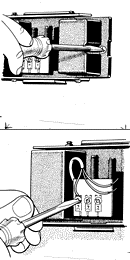 3. Wire and Install Chime
Attach the chime housing to the mounting plate (top); secure the wires under the proper terminal screws according to the wiring diagram (bottom); and install the cover. 4. Mount the Push Button(s) Bore a mounting hole for the push button in the exterior casing of the door. Remove one side of the interior casing (trim) from a door. If necessary, drill from the inside to extend the mounting hole to the gap between the framing and doorjamb. 5. Wire the Push Button Extend two low-voltage wires from inside out through the mounting hole; connect wires under the push-button screw terminals. Install the button with screws provided. Bore a hole to the basement/crawl space as described in Step 2 and feed the wires into the basement/crawl space. Reinstall the casing using 4d finishing nails into the jamb and 6d finishing nails into the wall.  6. Mount the Transformer
If you are replacing an existing chime or bell you may be able to use the existing transformer. Otherwise, remove the cover from a conveniently located, exposed 120-volt junction box (avoid attic locations if possible). Knock out and remove one disc (called a knockout) from the side of the box, insert the transformer's threaded sleeve in the hole, and secure it with the nut provided. (Turn the nut with the tip of a screwdriver, as shown.) Shut off the power to the circuit at the electrical panel. Open the junction box. Carefully remove the wire connectors from the conductors (wires). Use a neon circuit tester to verify the power is off by touching one lead to an exposed black wire and the other to a metal box or to the neutral (white) wire.  7. Wire the Transformer
Inside the junction box, join a black transformer wire to each of the two house leads (one black, one white). Strip about 3/8 inch of the insulating covering off the wires, twist them together clockwise, and twist on a wire connector. Secure the green transformer wire under a grounding screw in a metal junction box or (for a plastic junction box) to a bare or green grounding wire with a wire connector. 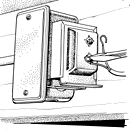 8. Connect Low-Voltage Wires
Connect the two low-voltage wires to the transformer terminals to complete the installation. Restore power at the circuit breaker and check the chime operation. If you have checked and double-checked all wiring connections as you made them, you're ready to greet your guests. Note: This article was submitted by a second party and the contents are subject to our disclaimer. |
|
||||||||||
| The Home Improvement Web Directory
- DIY Tips, Design, Decorating, Repair, and Improvement Information For The Consumer and Professional! "Find the information and resources you need for your home and property" |
||||||||||
| © 2001 - 2025 The Home Improvement Web Directory All rights reserved :: We are a "Family Friendly" site. | ||||||||||