|
Website: http://www.truevalue.com
Level of difficulty: Advanced

Nothing spruces up a kitchen better, faster, and easier that a new post-formed countertop. This type of top has an easy-to-clean rounded front edge and
integrated backsplash. Your home center sells straight sections in various lengths and can have its fabricator precut miters for L- or U-shaped layouts.
Bring a sketch with very accurate dimensions or eliminate any risk by taking advantage of the dealer's professional measuring services. Once the top has
been cut to size, you can begin installation.
Materials List
- Post-formed countertop sections
- Installation kits/hardware as req'd.:
- end splash
- end cap
- connecting bolts
- Wrenches for sink removal
- Fine up-cutting and down-cutting jigsaw blades
|
- Belt sander and/or block plane
- Hand laminate trimmer or router with flush trimming bit
- Matching-color or clear sealant
- Heat-conductive aluminum tape
- 1-1/4-in. screws or nails
|
1. Prepare the Area
When you have the new countertop in hand, as well as a free day and a willing helper, remove the drawers and cabinet contents. Shut off any water
valves, disconnect all piping, and remove the sink. Refer to appliance installation instructions to determine proper procedures for removing a cooktop
or other built-in appliance. Remove all screws attaching the cabinet to the underside of the counter. Before you lift and pull out the counter,
cut any caulk seal between the counter and the wall with the corner of a putty knife blade or similar tool. |
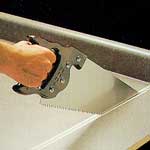 2. Cut Section to Length
If the end will butt a wall or an end panel, allow a little extra so you can cut the end to fit it to the wall. With the countertop face-up, apply
masking tape over the cut area and pencil a cut line on the tape. Verify that the cut is square with a framing square or by carefully measuring
from a square end. Use a fine-tooth handsaw to complete the cut. You must cut on the downstroke only, to avoid chipping the laminate. For added
accuracy, clamp a board to the top to guide your cut. |
 Tip:
Tip:
You can also use a circular saw with a finish blade allowing you to make a guided cut from the underside. |
 Caution:
Fresh-cut laminate is very sharp. Use a smooth file or sanding block to take off the sharp edge with a few shear strokes (down and along the edge
simultaneously). |
 3. Install the Buildup
Place the countertop upside-down and glue strips of wood (called buildup) to the back edge and the ends that are the same thickness, and to the
factory-installed front buildup. |
 4. Finish the Ends
Use a clothing iron set at medium heat to apply laminate caps on exposed ends. If the end abuts a solid cabinet panel, apply sealant to the end
of the counter and screw through the panel into the end of the counter. If the end butts a wall, attach a square-corner end splash to the end of
the countertop with screws before you install the top. |
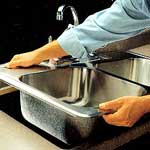
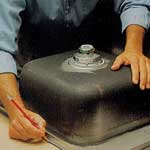 5. Make Any Cutouts
Follow the fixture- or appliance-maker's instructions for locating and making the cutout. Normally the cutout is made after the top is in place,
but when the backsplash is on it often prevents cutting the back edge. Here the outside perimeter of a sink is being traced and the actual cutout
will be 3/8-in. inside that line. Bore a starter hole for the blade well inside the line; and use a fine-tooth standard (up-cutting) jigsaw blade.
All corners should be rounded (1/2-in. radius). |
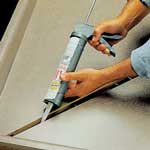 6. Join Mitered Sections
L- and U-shaped tops are ordered with precut miters and T-slots milled in the underside for the connecting bolts. Apply a bead of sealant to the
mating edges. Join the edges and tighten the bolts a little at a time. Using a wood block to protect the surface and a rubber mallet, tap the counter
to align the two pieces and tighten bolts more. |
 7. Scribe and Secure the Top
Position the counter against the wall so it overhangs the front edge of the cabinets an equal dimension all along its length. Set a scriber/compass
to the widest gap between the backsplash and the wall; with the metal point against the wall and the pencil on the top, move the pencil along the
wall to mark a parallel line on the top (a technique called scribing). Then use a belt sander (preferable) or block plane to remove the scribe edge
up to your line. Apply a bead of sealant on the backsplash, push the counter against the wall, and attach the top from below with screws installed
through cabinet corner braces. |
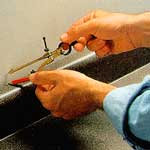
 8. Reinstall Fixtures and/or Appliances
Preinstall the faucet on a sink. It's easier to access the connections before the sink is in place. If you are installing a cooktop or built-in
range, protect the laminate under the lip of the unit with heat-conducting aluminum tape. |
Note: This article was submitted by a second party and the contents are subject to our disclaimer.
|