
| Home | Add URL | Privacy | Visitors | Contact Us | Disclaimer |
|
|||||||||
|
Surface Wiring or Wire Mold Installation |
| "Surface wiring systems can be used to extend electric power from any existing outlet to another location without cutting into walls, floors, or ceilings." | |
|
|
Install Surface Wiring |
|
|
Find Electric & Cabling Contractors, Electrical Supplies, Professionals, and Services in Canada, United States, and United Kingdom! Electrical Contractors, Builders, Remodelers, Professionals, Electrical Suppliers, and Businesses - join us in building the Best Home Improvement Directory on the Web by adding your Listing or Informational Article Today! Go To Electric & Cabling Contractors |
Website: http://www.truevalue.com Level of difficulty: BeginnerSurface wiring systems can be used to extend electric power from any existing outlet to another location without cutting into walls, floors, or ceilings. Surface wiring systems simplify the process; for one thing, you don't need to fish around for electric wire. They can also be used to conceal and protect existing lamp cords, wires, or cables inside their channels, called raceways. Other uses include lowering the height of a light switch in a child's bedroom, extending power across a floor to a desk or furniture island, adding a ceiling light or fan, and converting a duplex outlet to a strip of outlets for an appliance center in the kitchen. Choose an attractive, UL-listed system suited to your project, available at True Value Hardware stores. Most surface wiring systems come with project planners and material checklists. The system is easily removed as your needs change. 1. Plan ProjectMake a dimensioned sketch of your project to determine the type and number of components that you'll need - wire channel, outlet boxes, elbows (flat, inside, or outside corners), T-fittings, and related connectors. For best appearance, plan horizontal runs along the top edge of baseboards and, if possible, place vertical channels adjacent to door casing or in inside corners. 2. Install Boxes Turn off electric power and then remove the outlet cover and the screws that secure the receptacle to the box so you can screw the starter box to the existing outlet. Install surface mounting plates for any additional boxes, such as for switches, lights, or new receptacles. Always turn off the power to the circuit at your circuit panel or fuse box. If there is more than one set of wires in an outlet box, they may be on a separate circuit. Use a neon tester to be sure all the power is off. 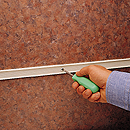 3. Install
Raceway 3. Install
RacewayMeasure, cut, and install the raceway between the boxes as directed. Attach the channel mounting brackets to the surface with screws or use anchors for hollow walls and masonry walls. (You'll need to drill a hole for an appropriate anchor.) Use elbows wherever the raceway needs to change direction, such as at inside and outside corners or when changing from horizontal to vertical.
Note: This article was submitted by a second party and the contents are subject to our disclaimer. |
|
||||||||||
| The Home Improvement Web Directory
- DIY Tips, Design, Decorating, Repair, and Improvement Information For The Consumer and Professional! "Find the information and resources you need for your home and property" |
||||||||||
| © 2001 - 2025 The Home Improvement Web Directory All rights reserved :: We are a "Family Friendly" site. | ||||||||||
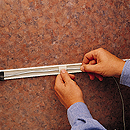 4.
Feed Wires from Point to Point
4.
Feed Wires from Point to Point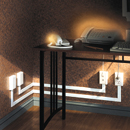 5.
Wire the Fixtures
5.
Wire the Fixtures