|
Website: http://www.truevalue.com
Level of difficulty: Intermediate

Installing new windows may or may not be a job you want to tackle yourself, but once a window is installed, you can save a considerable amount of money
if you apply the interior trim yourself. In most cases that consists of a stool and apron (what is often called a windowsill and the horizontal trim below
it), and head and side casings. In a picture-frame style trim, a piece of casing replaces the stool and apron. You'll probably want to own or rent a power
miter saw and, perhaps, a small table saw to rip the jamb extensions (Step 2) if you have more than one or two windows to do.
For additional guidance, see another project, Install Mitered
Door Casing.
Tools & Materials
- Tape measure
- Goggles or safety glasses
- Combination square
- Sandpaper (80- and 120-grit)
- 1x clear pine or poplar
- Sanding block
- Table saw
- Casing and stool molding
- Wood glue
- Saber saw or crosscut handsaw
- 4d & 6d finishing nails
- Power miter saw (recommended)
- Hammer (14- to 16-oz. claw type)
- Wood putty or wax filler sticks and soft cloth
- Nail set (3/32-in.)
- Block plane
|
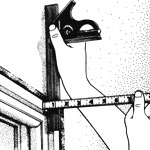 1. Measure Jamb
Typically a window frame will be narrower than the thickness of the wall, so the jambs (the frame members around the movable sash) must be extended
so they are flush with the interior finished wall surface. Measure the distance from the frame to the wall at several points, as shown. |
 2. Install Jamb Extension
Rip lengths of 1x knot-free lumber, such as pine or poplar, as thick as the largest dimension taken in Step 1; cut these strips to length and fasten
them to the jamb with wood glue and 4d finishing nails. Set the nails and use a block plane to remove additional wood as needed to make the extension
jamb flush with the wall surface. |
 Caution: Caution:
Wear goggles when working with power tools. |
 Tip: Tip:
- It looks best if the inside edge of the extension steps out about 3/32 inch from the inside edge of the jamb (this is called a reveal, the
slim edge that shows around the inside edge of the molding).
- When a natural finish, such as stain and varnish, is planned, avoid getting wood glue on exposed surfaces, or immediately wipe off any spills
with a damp cloth and sand lightly. The glue seals the wood so it will not accept stain or coloring to the same degree as the surrounding area
does.
|
|
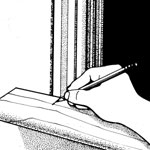 3. Fit the Stool (Sill)
Notch the ends of the stool so the portion between the jambs sits against the closed sash. First, cut a rough length of stool (length = outside
width of the window + 1-1/2 inches + at least 2 x casing width). Hold the stool in place, centered on the window, and mark the inside dimensions
of the window jamb on the stool. Next, close the lower sash. Measure from the sash to the edge of the stool at each side to determine the depth
of each notch. Use a combination square to mark the notches, and cut them with a handsaw or saber saw. |
Tip:
The casing will cover most of the length of the joint between the stool and the wall, but the stool should fit nicely against the wall at the ends. |
4. Install Stool
Tack the stool into the window sill with three evenly spaced 6d finishing nails. |
Tip:
It's generally a good idea to drive nails only as deep as needed to hold the trim in place until you confirm that all pieces in an assembly fit
nicely. Then any piece can be removed easily without damage in the event that cutting, planing, or sanding adjustments are required. |
 5. Install Head Casing
Cut a length of casing with an inside miter on each end (like a picture frame). For a proper reveal, the distance between the two short points must
equal the inside dimension of the jamb + 1/4 inch. Use a power miter saw to cut the first miter. Measure and mark the short point of second miter
and make the second cut. Carefully center the casing so there is a 1/8-in. reveal along the lower edge and tack it in place with 4d finishing nails
through the thin edge of the casing into the jamb. |
6. Install Side Casings
Measure the distance from the top corner of the head casing to the stool and cut the side casing with the long point of the miter equal to that
measurement. Test the fit. The beauty of a power miter saw is that you can make very slight adjustments, making a 45-degree angle a half-degree
larger or smaller, to improve the fit. Once the miter joint looks good, lightly tack it in place. Repeat for the other side casing. |
Tip:
To cut the side casing without measuring: Cut the miter and stand the casing upside down (and plumb) on the stool with its thick edge against the
point of the miter on the head casing. Then mark the top of the side casing at the point where they touch and square-cut the casing at your mark.
|
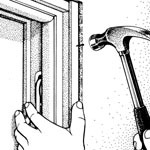
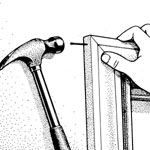 7. Complete Nailing
Remove the side casings and apply wood glue to the exposed end grain on the miters. Reposition the trim and complete the nailing. Start nailing
at the miter, nailing through the casing and into the jamb with 4d finishing nails and into the wall with 6d nails. Then cross-nail the corners
with 4d nails from the side (shown) and the top and complete nailing the rest of the casing, spacing nails evenly about 12 to 16 inches apart.
|
Tip:
To prevent nails from splitting the wood when cross-nailing, lubricate the nails by rubbing them over the side of your nose. (It truly works and
it's always handy.) |
8. Cut the Ears
Mark the ears (the notched portion) of the stool 3/4 inch beyond the outside dimension of the casing, and remove the stool to cut it to length at
your marks. |
9. Complete Stool Nailing
Fasten the stool to the sill again, then drive a 6d finishing nail through the underside of the stool and up into the bottom end of each side casing.
This will draw the stool and casing tightly together. |
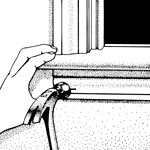 10. Install Apron
Measure the outside width of the installed casing. Cut a length of casing stock to this length with a 15-degree inside angle on each end. Place
the apron tight against the underside of the stool and centered. Then drive three evenly spaced 6d nails through the face of the apron into the
wall framing. |
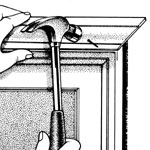
11. Set and Fill Nail Holes
Use a hammer and nail set to drive the heads of all nails slightly below the surface.
If you intend to paint:
Fill the holes with wood putty and sand it when it dries.
If you plan to varnish:
Apply the finish first, then fill the nail holes with color-matched wax filler sticks. Press hard and rub the stick back and forth in short strokes
across the hole. When the hole is full, buff any wax off the surface with a soft cloth. |
Note: This article was submitted by a second party and the contents are subject to our disclaimer.
|